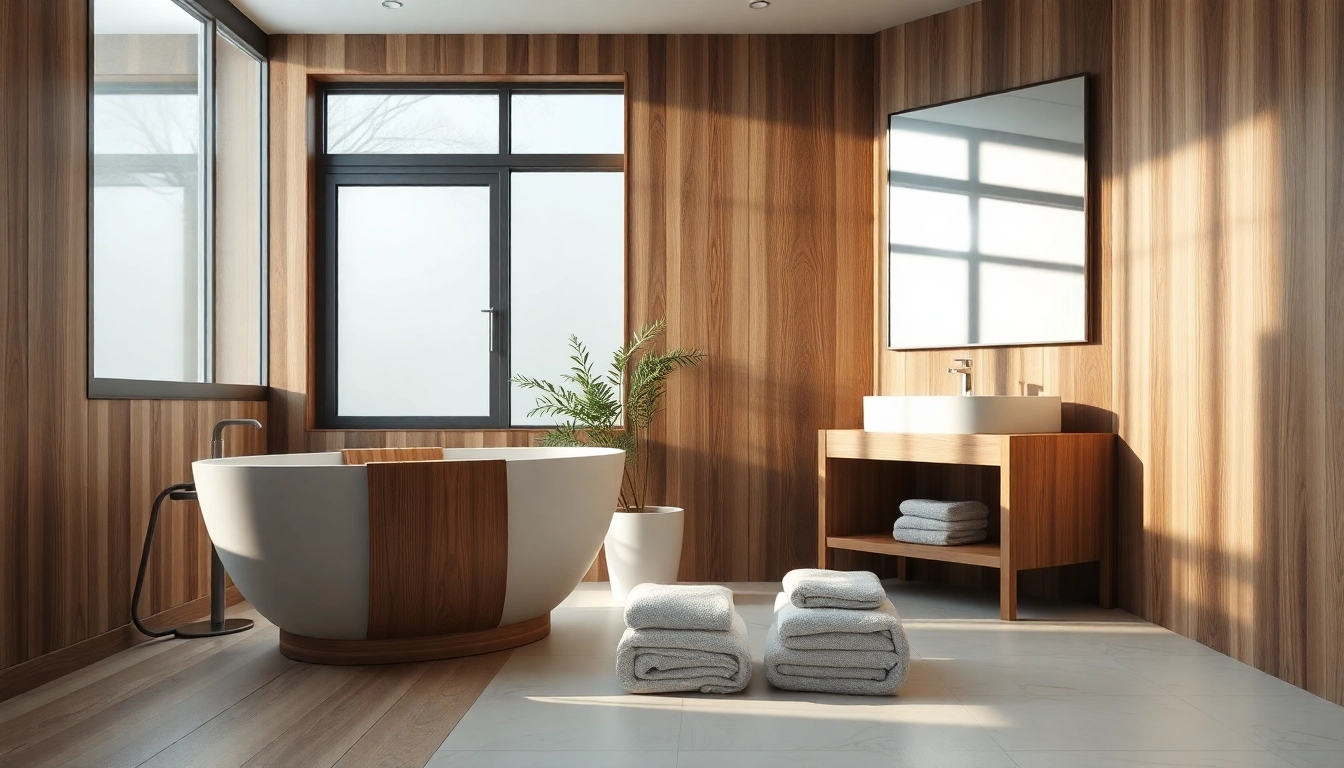
Introduction to Wood for Bathroom Walls
In recent years, the trend of incorporating natural materials into bathroom design has gained significant traction. Among these materials, wood for bathroom walls has emerged as a prime choice for homeowners looking to blend aesthetics with functionality. The allure of wood lies not only in its visual warmth but also in its versatility, adaptability, and the unique ambiance it brings to a bathing space. With proper selection and treatment, wood can withstand the humidity and moist conditions often found in bathrooms, making it a viable option for both design and durability. This article will delve into the various aspects of using wood for bathroom walls, including its benefits, types, installation, maintenance, and innovative design ideas.
Why Choose Wood for Bathroom Walls?
Choosing wood for bathroom walls allows for the creation of a serene and inviting atmosphere. The natural look of wood offers a stark contrast to the more sterile finishes of tile and fiberglass, providing a sense of warmth and comfort. Furthermore, wood absorbs sound, which can enhance the overall acoustics of the room, creating a peaceful retreat.
The choice of wood also reflects a growing trend towards sustainable building materials. Responsibly sourced wood options can be eco-friendly, aligning with modern-day values of conservation and sustainability. Through this material, homeowners can express their personal style while making choices that are gentler on the environment.
Benefits of Using Wood in Bathroom Design
1. Aesthetic Appeal: Wood can elevate the overall design of a bathroom. It comes in various shades and grains that can complement other elements, from minimalist modern to rustic farmhouse styles.
2. Insulation Properties: Wood has natural insulating properties, helping to regulate temperature and reduce energy costs, which is a valuable trait in areas with fluctuating temperatures.
3. Sound Absorption: Wood acts as a natural sound absorber, reducing echo and creating a more serene environment. This feature makes bathrooms feel more comfortable and tranquil.
4. Sustainability: When sourced from managed forests, wood is a renewable resource, making it a more sustainable choice compared to synthetic materials.
5. Versatility: Wood can be used in various forms—paneling, wainscoting, or even as accent walls—allowing for creative expression.
Common Misconceptions about Wood in Bathrooms
Despite its many advantages, several misconceptions may deter homeowners from considering wood for bathroom walls.
1. Durability Concerns: One common myth is that wood cannot withstand the moisture in a bathroom. When properly treated and maintained, wood can be just as durable as other materials.
2. High Maintenance: Many believe that wood requires excessive care compared to tiles or vinyl. While it does require some upkeep, with the right finishes and treatments, wood walls can be relatively low-maintenance.
3. High Cost: Although high-quality wood may come with a higher upfront cost, the long-term benefits and aesthetic value can outweigh this initial investment.
4. Limited Style Options: Another misconception is that wood offers limited design versatility. In reality, wood can be stained, painted, or left natural to match any design aesthetic.
Types of Wood Suitable for Bathroom Walls
When contemplating the use of wood for bathroom walls, it’s crucial to select the right type suited for humid environments. Not all wood is created equal, and certain varieties perform better against moisture and mold.
Best Wood Varieties for Humid Environments
Some of the top choices for bathroom wall applications include:
1. Cedar: Known for its natural resistance to moisture, rot, and insects, cedar is an excellent choice for humid environments. Its rich aroma and beautiful finish add character to the bathroom.
2. Redwood: Similar to cedar, redwood has natural oils that make it resistant to decay, making it suitable for bathrooms. Its reddish tones can provide a warm, inviting atmosphere.
3. Teak: Often utilized in high-end applications, teak’s exceptional resistance to moisture and warping makes it a premium choice for bathroom walls. Its durability ensures longevity in wet conditions.
4. Poplar: While more affordable, poplar wood can be a good option when properly treated and sealed. It’s versatile, easily painted, and can mimic more expensive woods when stained.
5. Pine: Though softwood, treated pine can also be used in bathrooms, especially in areas where ample ventilation is present. Its light hue lends an airy feel to the space.
Comparing Hardwood and Softwood Options
When selecting wood for bathroom walls, it’s essential to understand the differences between hardwoods and softwoods.
– Hardwoods (e.g., oak, teak, cherry) typically come from deciduous trees. They are denser and more durable, making them better for high-traffic areas or those requiring longevity. Their durability often means they can handle higher humidity levels better than lower-quality softwoods.
– Softwoods (e.g., pine, cedar) come from coniferous trees. They are generally more affordable and lightweight but can be more susceptible to moisture and damage if not properly treated. However, the right softwoods like cedar or treated pine can perform admirably in bathroom settings.
Ultimately, the choice between hardwood and softwood depends on budget, desired aesthetic, and environmental concerns.
Understanding Treated vs. Untreated Wood
One of the critical considerations when working with wood for bathroom walls is the treatment process.
– Treated Wood: This wood has undergone processes to enhance its resistance to moisture, rot, and insect damage. Preservative treatments often involve chemicals that help to ensure wood longevity in humid environments. Common treatments include pressure treating and sealing with specific wood oils.
– Untreated Wood: While untreated wood may initially look appealing, it is highly susceptible to moisture, leading to warping, mold, and decay over time. For bathrooms, untreated wood is typically not recommended unless it is used purely for aesthetic accents away from direct moisture exposure.
In conclusion, opting for treated wood is a wise investment for any bathroom renovation involving wood materials.
Installation Considerations for Wood Bathroom Walls
Successfully installing wood for bathroom walls requires careful planning, precise measuring, and the right tools. This section will guide you through essential considerations to ensure that your wood walls end up both beautiful and durable.
Preparation: Measuring and Planning Your Space
Before any installation begins, thorough preparation is crucial. Start by measuring the dimensions of your bathroom walls accurately. Consider the layout, noting any windows, plumbing, and electrical fixtures that may affect panel placement.
Creating a detailed plan, including sketches, can help visualize the final look and aid in calculating the amount of material needed. Don’t forget to account for any design features, such as patterns or color variations, that will enhance visual interest.
Tools and Materials Needed for Installation
Gathering the right tools is essential to ensure a seamless installation process. Here’s a list of common tools and materials you’ll likely need:
– Materials: Selected wood (paneling, planks, or boards), wood adhesive, moisture-resistant sealant, finishing products (stain or paint).
– Tools: Measuring tape, level, saw (circular or table saw), drill, hammer, wood screws, caulking gun, and safety equipment (gloves and goggles).
Having all these items ready before you start will help streamline the installation process, minimizing delays and unexpected complications.
Step-by-Step Installation Process
1. Prepare the Walls: Start by ensuring the walls are clean and dry. If you’re covering existing drywall, check for any mold and make repairs as needed.
2. Cut the Wood: Based on your measurements, cut your wood panels or planks to size. If you’re using patterned wood, plan how each piece aligns to maintain the design flow.
3. Apply Adhesive: Use a suitable moisture-resistant adhesive on the back of the wood panel or the wall where the panel will be placed.
4. Position and Secure: Carefully position the panel against the wall, using a level to ensure it’s straight. Secure with screws or nails as necessary, especially at edges and seams.
5. Caulk and Seal: Once all panels are installed, use caulk to fill any gaps. This will help prevent moisture penetration. Finally, apply a high-quality moisture-resistant sealant to protect the wood.
6. Finishing Touches: Stain or paint your wood panels if desired. Ensure this process is executed according to the manufacturer’s instructions to maximize durability.
7. Final Inspection: Check your work, ensuring all panels are securely in place and that there are no visible gaps that could allow moisture infiltration.
By following these steps meticulously, you’re setting the stage for a beautifully executed wood wall that can withstand the humid environment of a bathroom.
Maintenance Tips for Wood in Bathroom Walls
Proper maintenance is key to ensuring the longevity and beauty of wood for bathroom walls. Here are essential tips to keep your wood surfaces looking their best.
Cleaning and Upkeep for Longevity
Regular cleaning is vital to avoid mildew and grime buildup. Use a soft, damp cloth to wipe down wooden surfaces frequently—particularly in locations close to showers or sinks. Avoid harsh chemical cleaners that can degrade the wood finish.
For deeper cleaning, a mixture of mild soap and water can be effective. Always ensure the wood is fully dry afterwards to prevent moisture damage.
Addressing Common Issues like Moisture and Mildew
Despite best efforts, bathrooms can still present challenges like moisture buildup and mildew. To combat these issues:
1. Ventilation: Ensure your bathroom is well-ventilated. Utilize exhaust fans while showering to minimize humidity levels.
2. Inspection: Regularly inspect for signs of deterioration, such as discoloration or warping. Address any issues immediately to prevent further damage.
3. Regular Sealing: Every few years, reseal the wood to maintain its resistance to moisture. This proactive approach can extend the life of your wood walls.
Recommended Treatments and Sealants
Choosing the right sealant is imperative for preserving wood in a bathroom setting. Look for water-based polyurethane or marine-grade sealants designed for high-moisture areas.
Apply these treatments according to the manufacturer’s instructions, ensuring that you cover all surfaces thoroughly. Reapplication may be necessary every couple of years, depending on bathroom usage and humidity levels.
Design Ideas Using Wood for Bathroom Walls
Integrating wood into your bathroom’s design can also bring about innovative aesthetics. Here are some creative ideas for utilizing wood effectively.
Integrating Wood with Other Materials for a Balanced Look
To achieve a harmonious design, consider mixing wood with other complementary materials.
– Wood and Tile: Pair wood walls with ceramic or porcelain tile. Use wood as an accent to frame the shower area, creating a stunning focal point.
– Wood and Metal: Pairing wood with metal fixtures can provide a modern industrial flair. Think metal accents on mirrors, faucets, or shelving against warm wood backgrounds.
– Wood and Stone: The juxtaposition of natural stone and wood can create a spa-like atmosphere. Incorporate stone countertops with wooden cabinets or walls for a balanced natural look.
Color Schemes that Complement Wood Finishes
Selecting colors to complement wood finishes is critical for creating a cohesive appearance.
– Neutral Tones: White, beige, and soft grays can create a clean backdrop that lets wood textures shine.
– Earthy Colors: Deep greens, rich browns, or soft blues can enhance the organic feel that wood brings, mimicking nature’s palette.
– Bold Accents: Consider adding bold colors as accents through accessories like towels, shower curtains, or artwork. This can create visual interest without overwhelming the space.
Innovative Textural Combinations for Unique Spaces
Playing with different textures can elevate the design further.
– Reclaimed Wood: Incorporating reclaimed wood can add character and a touch of history to your bathroom.
– Mixed Patterns: Combine different wood patterns (e.g., vertical panels with horizontal planks) to add visual intrigue and dynamism to the walls.
– Natural Elements: Introduce plants or decorative stones alongside wood elements to enhance the natural ambiance.
By experimenting with textures and materials, wood can become a stunning highlight in your bathroom space.
Conclusion
Utilizing wood for bathroom walls can transform your space into a serene retreat that combines functionality and aesthetics. With many wood varieties and design ideas available, homeowners can tailor their bathroom to reflect personal style while enjoying the numerous benefits wood provides. By embracing proper installation techniques and maintenance practices, wood can stand the test of time, creating a warm and inviting environment that enhances daily rituals. This versatility makes it clear that wood is not just a trend but a lasting solution capable of elevating bathroom spaces for years to come.